New Changes in Two Man Auger Bits | Issue No. 19

New Changes in Two Man Auger Bits

For 2014, there are changes in the bits that utilized with the General 330H Two Man Auger. These are the first significant change in the bit boring head design in over 50 years! This is an update to help provide further information to correctly order replacement parts.

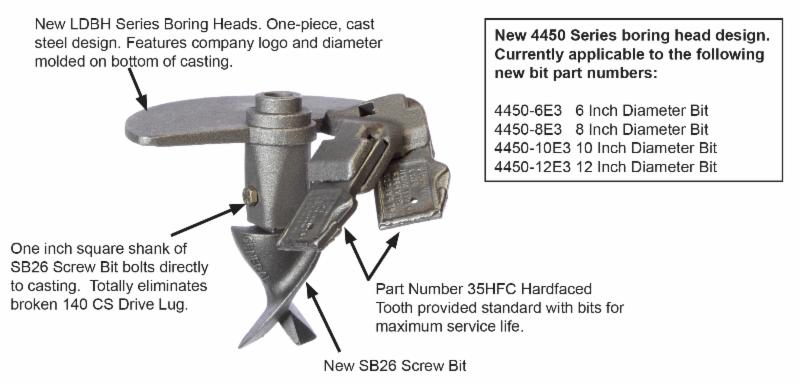
New 4450 Series bits incorporate the following changes:

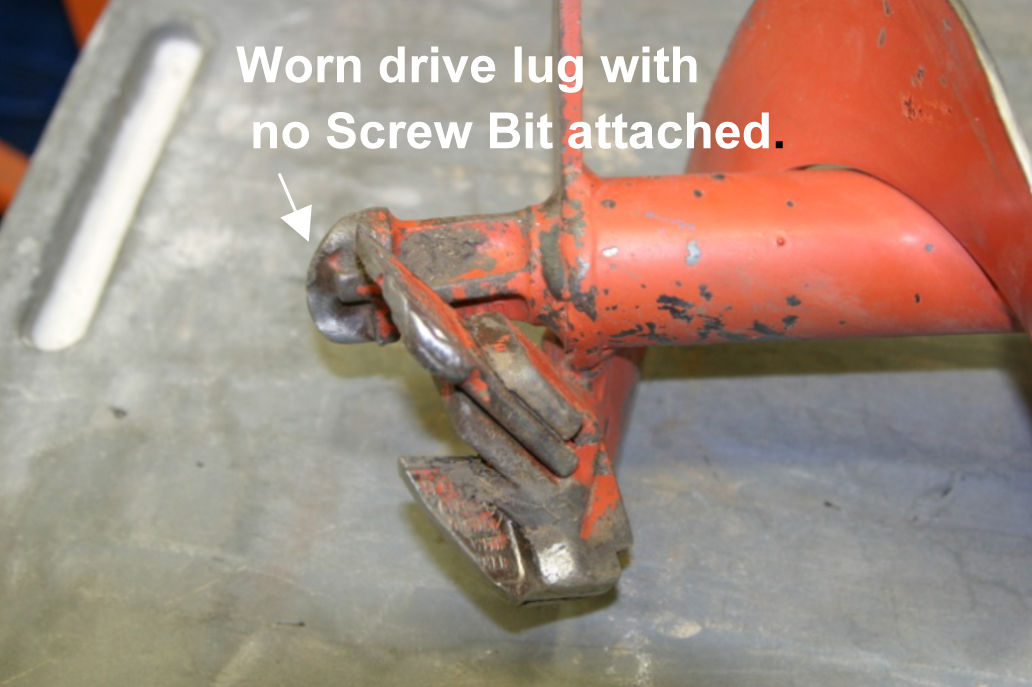
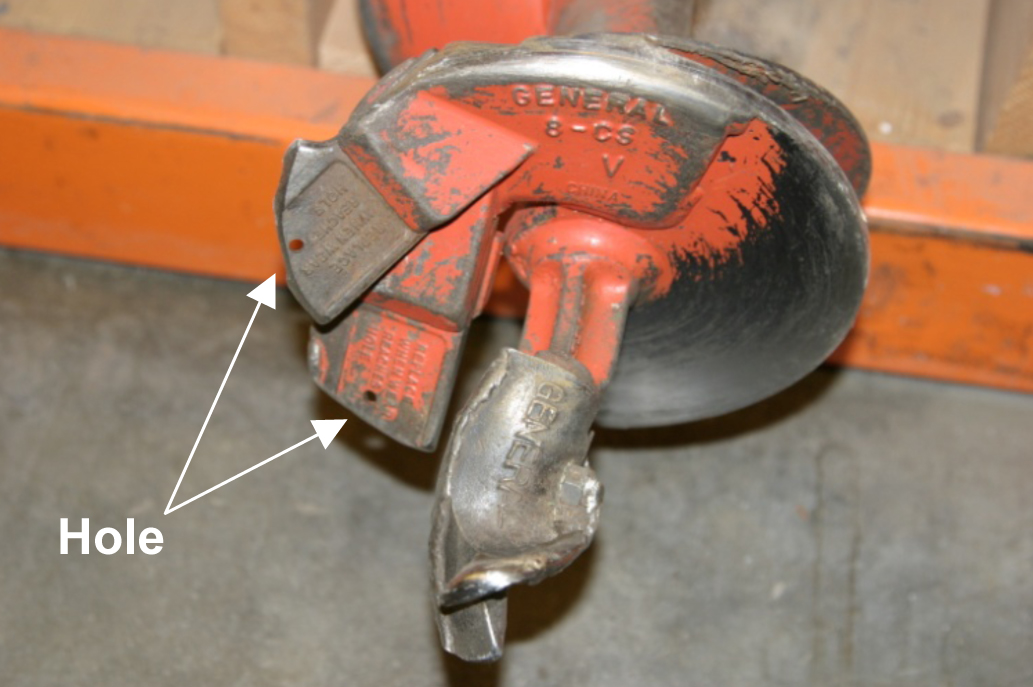
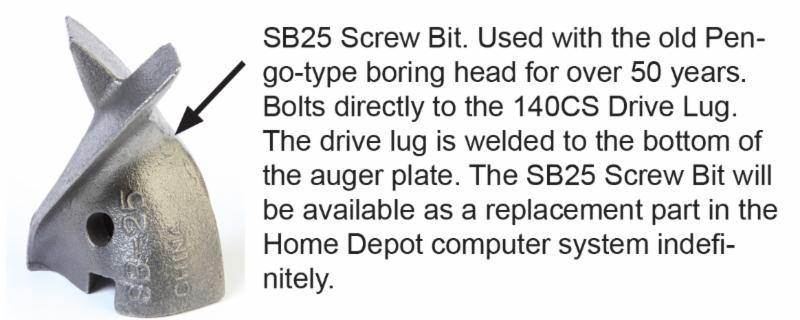
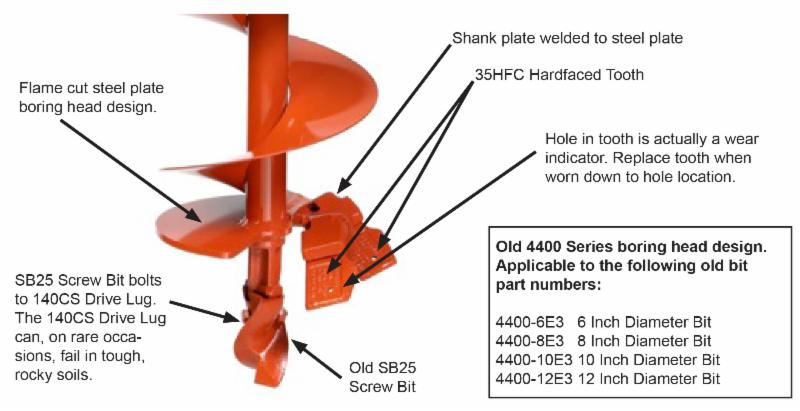
  • Eliminates the 140CS Drive Lug.
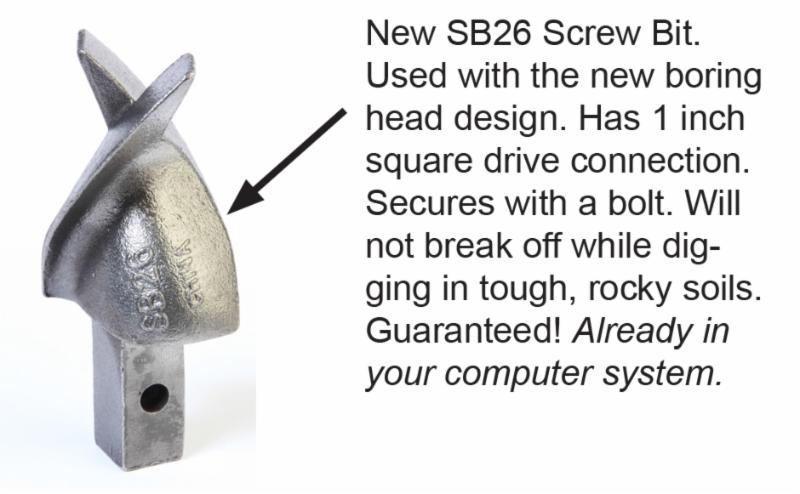
  • Replaces the SB25 Screw Bit with the new SB26 Screw Bit. The SB26 Screw Bit design eliminates any potential breakage from the 140CS Drive Lug.
  • Features a one piece, steel casting assembly with the specific bit diameter and General logo molded into it.
  • Sophisticated software was used to optimize tooth angle and position.
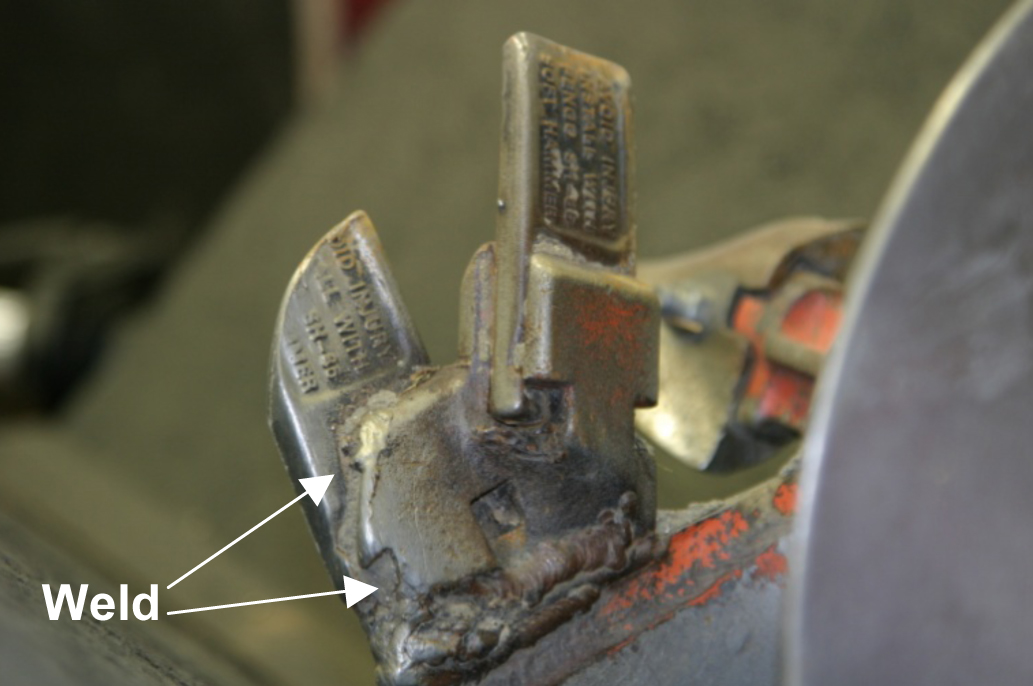
  • The new design better allows the bit to be more easily robotically welded. Robotic welding will increase manufacturing consistency and quality.

So…what’s the big deal? A bit is a bit. Right?

Well, the big deal is this: General is doing something different to manufacture a bit that digs better and lasts longer. The new 4450 Series bits are available in popular sizes: 6, 8, 10 and 12 inch diameter. Look for them beginning in February!


Need help?

Call us at 800.533.0524, or
email: support@generalequip.com.

Replacement wear part numbers for the 4450 Series Bits are as follows:

  • Teeth: Part Number 35HFC
  • Screw Bit: Part Number SB26
  • Bit Connecting Pin: Part Number 2121

Bit Part Number Information:

  • New 4450-6E3 6 Inch Diameter, Replaces 4400-6E3
  • New 4450-8E3 8 Inch Diameter, Replaces 4400-8E3
  • New 4450-10E3 10 Inch Diameter, Replaces 4400-10E3
  • New 4450-12E3 12 Inch Diameter, Replaces 4400-12E3
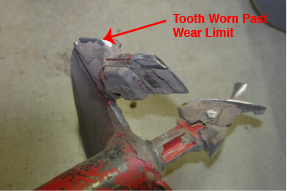
 Screw Bit Design Comparison

eHelp19p_ImgA

eHelp19p_ImgB


 New 4450 Series Bits

 eHelp19p_ImgC

Old 4400 Series Bits

eHelp19p_ImgD

If you have any questions or comments, please feel free to contact us.
Telephone: 800.533.0524 | Email: support@generalequip.com

No Oil in General 300 Series Transmission, BIG HEADACHE | Issue No. 18

Question: What Happens if a General Two Man Hole Digger is Operated Without Oil in the Transmission?

Answer: Lots of Damage!

 
All General Two Man Hole Diggers use 10W30 or 30 weight oil to lubricate the transmission gears and bearings. The same oil that you use to also fill the engine. Units are shipped from the factory with oil provided in separate plastic bottles for both the engine and transmission.
Recently, a warranty claim was filed for a Hole Digger that had been placed in service only three months earlier. The claim was the transmission was defective.
 
Upon inspection:
• The oil fill plug had never been removed.
• The transmission had never been filled with oil.
• The lack of lubrication produced significant and costly internal damage.
• The damage was not covered by warranty.
  eHelp18PImg1   
General hole digging products are overbuilt for heavy duty usage and will deliver years of satisfactory service with just regular maintenance. However, for that to happen, it is critically important that the correct amount and type of oil be used to fill both the engine and transmission!

eHelp18PImg2
eHelp18PImg3

Need help?
Call us at 800.533.0524, or
email: support@generalequip.com.

eHelp18PImg4If you have any questions or comments, please feel free to contact us.
Telephone: 800.533.0524 | Email: support@generalequip.com

It’s summertime and auger are in high demand | Issue No. 17

It’s summertime and augers are in high demand.

Is is time for some very much needed auger maintenance?

 
Summer activity increases the demand for renting augers. It also increases the wear rates for high wear parts, including teeth, blades and screw bits. Good bit maintenance practices will provide your customers with higher satisfaction from their rental experience. That means more repeat customers!

Need help?
Call us at 800.533.0524, or
email: support@generalequip.com.

 Take a look. Is it time to replace those worn parts on your Two Man augers?

AugerF3

Note the hole provided in the 35HFC Tooth. The hole is a wear indicator. When the tooth wears down to the hole, it is time to replace the tooth! Protect your investment.


AugerF2

This is what happens when teeth are not replaced as needed. The replacement tooth was then welded to secure it to the bit shank plate. When the tooth further wears, the auger can only be scrapped. Protect your investment!


Poor maintenance allowed this auger to be rented without a Screw Bit or tip bolted to the drive lug. Do you have Two Man auger that look like this? If so, they need to be scrapped because of safety and performance considerations. Protect your investment!

Poor maintenance allowed this auger to be rented without a Screw Bit or tip bolted to the drive lug. Do you have Two Man auger that look like this? If so, they need to be scrapped because of safety and performance considerations. Protect your investment!


If you have any questions or comments, please feel free to contact us.
Telephone: 800.533.0524 | Email: support@generalequip.com

How do you check the transmission oil level in 300 Series Hole Diggers? | Issue No. 16

Questions: How do you check the transmission oil level in 300 Series Hole Diggers?

Answer: Follow procedure in the Operator Manual.

 
Note: This information applies only to the General 330H, 343H and 357H Hole Diggers.
 

CAUTION!
300 Series Hole Diggers are shipped from the factory without oil in the transmission. Oil is provided in the original shipping carton. Failure to properly fill and operate the transmission with oil can result in damage that is not covered by the product warranty program.

Need help?
Call us at 800.533.0524, or
email: support@generalequip.com.

Steps below to check oil level.

  1. Do not check oil level with the engine running!

  2. Place the Hole Digger on a level surface.

  3. Wipe any dust or dirt from the transmission oil filler/level plug area.

    The oil filler/level plug is located on the side of the transmission. FIGURE 1.

    300TranOil1

  4. Remove the plug with a suitable wrench. FIGURE 2.

    300TranOil2

  5. The transmission oil level is to be maintained at the bottom of the oil filler/level plug hole. FIGURE 3.

    300TranOil3

  6. If the oil level is not visible add oil up to bottom of the hole. DO NOT OVERFILL.

  7. Allow excess oil to drain out of the transmission if overfilled.

  8. Inspect the oil fill plug gasket for proper security. If necessary, replace the gasket with a factory approved replacement part only. FIGURE 4.

    300TranOil4

  9. Reinstall the oil filler/level plug. Tighten securely with a suitable wrench. FIGURE 2.

  10. Wipe off any excess spilled oil. Properly dispose of any spilled oil.

 CAUTION!
Correct oil level is important to insure proper centrifugal clutch operation. Excessive oil level will cause excessive clutch slippage. Low oil level will cause improper lubrication. Both conditions will cause high operating temperatures that will reduce service life and affect digging performance. Service related problems as a result of improper transmission lubrication are not covered by the product warranty program.


Transmission Oil Capacity: 1 US quart (.94 l)
Transmission Oil Type: SAE 10W30, SAE 30 Detergent, conforming to API Classification SJ or later
Consult the Operator Manual for additional information.

To download the Operator Manual, Click or copy and paste the
URL: http://www.generalequip.com/prod_library/267-item.pdf into a browser.


 If you have any questions or comments, please feel free to contact us.
Telephone: 800.533.0524 | Email: support@generalequip.com

Correct Method to Check Oil Level for the Honda GXV140 and GXV160 Engine? | Issue No. 15

Questions: What is the Correct Method to Check Oil Level for the Honda GXV140 and GXV160 Engine?

Answer: Check According to the Honda Developed Procedure.

 
Note: This eHelp! only applies to the General 330H, 343H and 357H Hole Digger powered by the Honda GXV140 and GXV160 engines!
 
Filling the engine crankcase with oil will require a level working platform of sufficient size and appropriate height. As an alternative, the transmission driveshaft can be securely in a suitable bench vise.
 

CAUTION:
Running the engine with insufficient oil can cause serious engine damage.

Need help?
Call us at 800.533.0524, or
email: support@generalequip.com.

Steps below to check oil level.

  1. Do not check oil level with the engine running!
  2. Place the Hole Digger on a level surface.
  3. Wipe any dust or dirt from the crankcase dipstick/filler plug area.
  4. Remove the oil filler cap/dipstick and wipe clean.
  5. Insert the oil filler cap/dipstick into the oil filler neck as shown, but do not screw it in. Remove it to check the oil level. FIGURE 1.

    GXV160_Oil2

  6. If the oil level is near or below the lower limit mark on the dipstick, fill with the
    recommended oil to the upper limit mark, DO NOT OVERFILL. FIGURE 2

    GXV160_Oil1

  7. Screw in the filler cap/dipstick securely. Wipe off any excess spilled oil. Properly dispose of any spilled oil.


WARRINING:
Failure to follow correct procedures can give an inaccurate oil level reading.


The correct oil capacity for the Honda GXV160 engine is .65 Liter or 23 US fluid ounces. Refer to the Owner’s Manual supplied by Honda for additional information including type and weight. Service related problems as a result of improperly filling the engine with oil are NOT covered by the Honda warranty program.

To download the Honda Owner’s Manual, (for the GXV160 engine), type or copy and paste the
URL: http://engines.honda.com/pdf/manuals/31ZE6030.pdf into a browser.


 If you have any questions or comments, please feel free to contact us.
Telephone: 800.533.0524 | Email: support@generalequip.com

Correct Method to Check Oil Level for the Honda GX35 Engine? | Issue No. 13

Questions: Correct Method to Check Oil Level for the Honda GX35 Engine?

Answer: Check According to the Honda Developed Procedure.

 
Note: This eHelp! only applies to the General 240H Hole Digger powered by the Honda GX35 engine! It does NOT apply to the 240 Hole Digger powered by the Subaru EH035V engine.
 
We have received field reports of the Honda GX35 engine not operating properly due to engine oil exiting the air cleaner through the crankcase vent.
 
The cause of the problem is an excessive oil level in the crankcase. Operation of the engine then forces oil through the crankcase breather vent.

To properly check the oil level:

  • Position the 240H Hole Digger upright with the throttle control in contact with a suitable surface as depicted in FIGURE 1.
  • Hold the fuel tank level or parallel relative to the surface.
  • Remove the dipstick and check the oil level.
  • Replace the dipstick and secure finger tight.
eHelpNo13_img1

FIGURE 1. Note that fuel tank is positioned level or parallel relative with the surface.

Need help?
Call us at 800.533.0524, or
email: support@generalequip.com.

If excess oil flows from the crankcase, follow this procedure as described in the Owner’s
Manual provided by Honda:

Oil in the crankcase is difficult to remove; it cannot be pour or drained out…it must be
pumped out as the engine operates.

  • Replace the dipstick.
  • Position a shop towel under and around the engine spark plug to prevent oil from staining clothing and other personal property.
  • Remove the spark plug.
  • Pull the recoil starter and expect oil to rapidly exit the spark plug hole. Repeat this step until oil no longer exits. This will eliminate engine damage cause by hydro locking.
  • Replace the spark plug.
  • Drain oil from the crankcase until the oil just shows on the tip of the dipstick.
  • Run the engine for several minutes and then recheck the oil level.
  • If the oil level has increased, drain the excess oil so that the level is again just to the tip of the dipstick.
  • Repeat this procedure until the oil level no longer increases after the engine is run.
  • Replace the dipstick and secure finger tight.

Do NOT check the oil level with the engine positioned as in FIGURE 2. This procedure can allow the crankcase to be filled with excess oil.

eHelpNo13_img2

FIGURE 2 depicting the improper method to check oil level for the Honda GX35 engine.

The correct oil capacity for the Honda GX35 engine is 100 cc or 3.4 fluid ounces. Refer to the Owner’s Manual supplied by Honda for additional information including type and weight. Service related problems, as a result of filling the engine with excessive oil, are NOT covered by Honda warranty program.

 If you have any questions or comments, please feel free to contact us.
Telephone: 800.533.0524 | Email: support@generalequip.com

What is the Correct Auger Pin? | Issue No. 11

Questions: What is the Correct Auger Pin for use with General 240 and 330H Hole Diggers?

Answer: Part Number 2121 Auger Pin.

 
Using the 2121 auger pin with the 240 and 330H Hole Diggers is very important to:


• Minimize damage to the transmission driveshaft.
• Minimize auger hub elongation and wear.
• Maximize operator safety…improper pins or bolts can break or snag operator clothing.

Need help?
Call us at 800.533.0524, or
email: support@generalequip.com.

Notes regarding the 2121 Auger Pin:

• Fits both the 240 and 330H Hole Diggers.
• Fits 2135 and 4400 Series Augers and 5500 Series Extensions.
• Fabricated from 3/8 inch diameter, special alloy steel.
• Heat treated to eliminate bending.
• Use of a smaller, 5/16 inch diameter pin damages transmission driveshafts and
elongates auger hubs.
• Do not substitute common bolts! Bolts do not have proper strength.
• Do not substitute alternative safety pins or retaining clips to secure the pin.


If you have any questions or comments, please feel free to contact us.
Telephone: 800.533.0524 | Email: support@generalequip.com

Why Doesn’t my Auger Dig Better? | Issue No. 10

Questions: Why Doesn’t my Auger Dig Better?

Answer: Because You Auger is Worn Out!

Anything that digs in the ground requires constant maintenance with wearable parts replaced when necessary. All General earth augers are manufactured with replaceable wear parts. These parts include:

  1. Blades or teeth.
  2. Screw Bits.

If both the teeth/blades and screw bits are worn past their useful limits, at least one of three things will happen:

  1. The auger is now incapable of properly penetrating the soil to dig a hole.
  2. The auger becomes a safety issue because it will not track straight.
  3. Worn augers produce unhappy rental customers that demand their money refunded!

Need help?
Call us at 800.533.0524, or
email: support@generalequip.com.

Any auger worn past its useful limits should be removed from service, scrapped and replaced!

This edition of eHelp! will illustrate several examples of worn augers that were scrapped because of diggin performance and safety concerns.

How many of your augers should be scrapped?
Bad Auger 1


The outside tooth of this 4400-8E3 Earth Auger is severely worn from extended use. There is insufficient material remaining to secure a replacement outside tooth. The auger will now “bind” itself in the hole while digging and is no longer capable of digging an 8 inch diameter hole. The auger was removed from service and scrapped.

  Bad Auger 2

 This 4400-6E3 Earth Auger is missing the 35HFC Tooth. Digging performance will be minimal even in soft soil conditions. Want to minimize complaints? Before each use, always check to see the proper blade or teeth and the correct screw bit are installed.


 Bad Auger 3

The blade for this 2135-6E Earth Auger was allowed to wear where it became impossible to install the correct replacement blade. For some, unknown reason, a replacement blade for an 8 inch auger was incorrectly welded upside down on the steel plate. The blade angle is also incorrect. The auger was scrapped for performance and safety considerations.


 Bad Auger 4

The SB25 Screw Bit from this 4400-8E3 Earth Auger (auger tip) became missing. It was not noticed and never replaced. The drive lug is significantly worn (what remains of it) and will not allow the auger to properly track. This auger was scrapped for performance and safety concerns


If you have any questions or comments, please feel free to contact us.
Telephone: 800.533.0524 | Email: support@generalequip.com

How Should a Tile Stripper Blade be Used? | Issue No. 06

How Should a Flat, Beveled Edge-Type Tile Stripper Blade be Used?

Using the proper blade when operating a General FCS Series RIP-R-STRIPPER (or similar product) for any specific job application will make all the difference between success and failure for your project.

What’s the correct use of a beveled edge blade? Typical blades are available in a variety of widths and are very popular for removing VCT type materials (usually 12 inch square) from both concrete and wood surfaces:

  • Can feature both single and dual, beveled edges depending upon configuration.
  • Beveled edge faces UP and TOWARD operator when used on a concrete surface.
  • Beveled edge faces DOWN and AWAY from operator when used on a wood or some underlayment materials.
  • Use of a blade with beveled edge facing UP and TOWARD operator on a wood floor will produce severe damage and significantly reduce machine control.

 FCS16-1300

Need help?
Call us at 800.533.0524, or
email: support@generalequip.com.

FCS10 


FCS16-1300 Single Beveled Edge Blade being used to remove VCT from a concrete floor with a General FCS10 RIP-R-STRIPPER.


 If you have any questions or comments, please feel free to contact us.
Telephone: 800.533.0524 | Email: support@generalequip.com

Properly Dig with a Two Man Hole Digger. | Issue No. 03

What do I need to Properly Dig with a General 300 Series Two Man Hole Digger?

Digging holes is a physically demanding job. Before starting, ask yourself: 

  1. Am I physically and mentally up to this task? 
  2. Do I have the physical attributes and skill sets necessary to dig in a safe and productive manner? 
  3. Have I read the Operator Manual and viewed the Safety and Operational Information Video? Do I understand the material? 
  4. Is the machine, including the auger, in good working condition?

Need help?
Call us at 800.533.0524, or
email: support@generalequip.com.

Personal Considerations Include:

Strength Icon


 Strength

Digging holes is a strenuous activity, and can affect all body parts, including arms, wrists, hands and back. Each operator needs to have sufficient body strength to properly withstand kickback and other forces while digging. When both operators have similar strengths, digging forces are more equally balanced.

 Height Icon

Height

Each operator leverages himself to balance against kickback and other forces encountered while digging. Increased operator height provides additional mechanical advantage to react against these forces. When both operators are of similar height, forces are more equally balanced.

  Intelligence Icon   

  Common Sense

 You need to balance:

  • Past experience
  • Jobsite terrain
  • Soil conditions
  • Potential for buried obstructions
  • Auger diameter and digging depth

…to dig in a safe and productive manner.


Strength + Height + Common Sense = Success.

While this formula will not guarantee success, it illustrates that a practical combination of strength, height and common sense are important considerations that work together to help maximize efficiency and safety when digging with the General 300 Series Two Man Hole Digger.


 If you have any questions or comments, please feel free to contact us.
Telephone: 800.533.0524 | Email: support@generalequip.com